November 15, 2009

Mushroom Pie!

My roommate and I love mushrooms! Over a year ago I had the pleasure of eating a mushroom pot pie at Kalapawai restaurant in Kailua and was totally smitten. Unfortunately for me, the last time I was there the pie was no longer on the menu. Tonight, we've gone and attempted our own. This recipe is not for those who are afraid of butter!


Ingredients:

Mushrooms! - I used Oyster, Shimeji, Ali'i, and Pioppini - total 12 oz.
butter - about 6 T. total
1 onion
white wine - I used sauvignon blanc
heavy cream
1 T. thyme
pinch of sage
potato - I used 1 red skin and 1 russet
2-3 leaves swiss chard
salt and pepper to taste
2 pie crusts - I cheated and bought it

Directions:

I started by chopping the onion and sauteing it in the butter (about 2T.) at medium heat until the bottom of the pan was coated in brown deliciousness (which I just looked up - it's called "fond" according to reluctantgourmet.com) and the onion was caramelized. While this was cooking, the mushrooms were washed and chopped or separated depending on how big they were. Once the onions were finished, I added 2 T or so of butter to the pan and the mushrooms. I turned the heat down a little and stirred them up so the muchrooms all got a little coated in the butter, then I added maybe 1T. of thyme and a pinch and a half of sage.


I let that cook for about 5 minutes or so, then I added enough white wine to scrape the fond off of the bottom of the pan. I let that cook a little bit (maybe another 5 minutes), then I added the salt and pepper, heavy cream, and more wine - I wanted enough liquid to make sauce that would coat the mushrooms and the potatoes inside the pie crust.


At this point I also had chopped up the potato and had that boiling. Once they were soft (but not too soft) they were strained and set aside in the pot with 2 T. of butter and salt and pepper and partially mashed.


Once the sauce in the mushroom pot had thickened and settled sufficiently, we mixed 2 big spoonfuls of potato into the mushroom mixture. This was mixed until smooth then 2-3 leaves of chard were chopped and mixed in. This was poured into the pie crust and covered with a second pie crust and then put in the oven at 375 deg for 25 minutes.


It was more delicious than I can really describe!

June 10, 2009

Greens and Red Onion Pizza

So this year the thing that I can't figure out to do with in my CSA box is greens. Greens like chard, beet greens, spigariello, mustard greens, kale, etc. So in the last few weeks Sarah and I have been scouring our cook books to find something - anything - to get us through this. By the way, I have a cook book problem: I like them too much and am running out of space in my kitchen to hold them all...damn.

Anyway, here is one variation on "Bread with Greens". Jesse smelled me eating something like this at lunch and had to have the recipe. No pictures this time, sorry.

Greens and Red Onion Pizza

1 Batch Pizza dough (see earlier post)
Olive oil
1 small yellow onion
3 cloves garlic
bunch of fresh herbs (I like oregano, basil, and thyme, but it's up to you)
1/2 tsp. red pepper flakes
Juice of 1 lemon
5 cups cooking greens (chard, kale, spinach, beet greens, etc.)
Olive oil
2 very small red onions or 2 large shallots, thinnly sliced into rings
A good handfull of mozzarella
1/4 cup kalamata olives, diced
Extra cheese (romano, feta, brie, anything you like really)
Fresh oregano
Fresh basil

Make dough about 1 1/2 hours before hand. Pre-heat the oven to 500F about an hour before you're ready to bake the pizza. Rinse and chop the greens, do not dry.

Saute the onion in olive oil for about 10 to 15 minutes with some salt to draw out the juices. Once these have carmelized add the garlic, herbs, and pepper flakes; saute for another minute or two without browning the garlic. Add the greens all at once, cover, and steam them in their own water until slightly wilted then remove the lid and saute the greens over low heat with some lemon juice until all the liquid has evaporated. Set aside.

Roll out the dough onto a peel or pizza pan and cover libearally with olive oil. Sprinkle half of the red onion rings onto the dough then cover with the wilted greens. Cover this with mozzarella, then diced olives, a little extra cheese, and fresh oregano. Slide the whole mess into the hot oven and bake for about 7 minutes, or until the cheese just starts to bubble. Pull it out and top with strips of fresh basil. Voila!

Another variation would be to use butter in the pizza dough instead of olive oil and add an egg to enrich the dough. Then make a filling with the same wilted green saute by adding an egg and a hand full of cheese with about a tablespoon of paprika. Roll out little rounds of dough, about 6 inches across, and plop some of the filling in the middle. Fold the dough over the filling to make a turnover and pinch the edges with the tines of a fork. Brush with egg wash, poke holes in the top, and bake in a 400F over for about 15-20 minutes. This is adapted from Deborah Madison's
Vegitarian Cooking for Everyone.

May 5, 2009

Guest Chef: George!

Udon and Broccoli A La George!

Udon Ingredients:

1 lb (ish) udon (fresh or frozen)
1 carrot
1/2 onion
mushrooms
3 cloves garlic
3 or 4 green onion stalks
2 T. sesame seeds
1-2 T. rice vinegar
1 T. sesame oil
1-2 T. soy sauce
vegetable oil


Directions:

Boil water for udon - cook for about 1 minute and then strain and rinse with tap water until cool to touch. set aside.
clean and slice mushrooms, carrots, onion, and green onion (separate white and green parts). Mince the garlic. Blanch carrot to begin with - put large frying pan (with lid) over high heat. Add a small amount of water when pan is hot, then add carrot and cover, add a small amount of vegetable oil if desired. Stir occasionally, carrot will probably char a bit, but once they're soft enough add onion, garlic, white parts of the green onion, and mushrooms and a little bit more vegetable oil. Let cook for about a minute.


After vegetables have cooked for a bit, add udon, soy sauce, vinegar, and sesame oil. stir fairly constantly for another minute or so before adding green onion (just want them to wilt) and turning off the fire.


sprinkle sesame seeds on and adjust vinegar, soy sauce, and sesame oil levels to taste.


Broccoli!

Ingredients:

3 heads broccoli (torn apart - see pic)
3-4 cloves garlic (minced)
vegetable oil
salt to taste

sauce
1 heaping tsp. corn starch
3/4 c. water


Directions:

blanch the broccoli - small amount of water and broccoli in a covered pan until broccoli turns nice and green and slightly soft but still firm.
While broccoli is blanching, combine cornstarch and water (start with the water and add the cornstarch to the water), stir until cornstarch is completely dissolved.
Strain broccoli then add 1 T. vegetable oil and garlic to the pan. cook the garlic for roughly 30 sec before adding the broccoli back in to the pan. stir for about a minute. Pour in the cornstarch mixture and stir until sauce thickens. Add salt to taste.


Yum deliciousness!!!

April 28, 2009

The Golden Log

This is a recipe for my "Golden Log" which is basically like a calzonne but with a sushi like roll to it. I was thinking of a way to use what I learned from the Cobbler Roll and apply it to something savory, here is what I came up with:

Ingredients:
Biscuits:
2 C. unbleached all-purpose flour
3 tsp. baking powder
1 tsp. salt
1 tsp. black pepper
1 tsp. cumin
1 tsp. coriander
1 tsp. turmeric
1/4 C. cold butter, cut into 1/2 inch cubes
3/4 C. milk


Filling:
1-2 Chicken Breasts
1/2 can of chic peas (or dried)
1/2 can of black beans (or dried)
Tomatoes
Cilantro
Onions
Potatoes
Sweet potato (or yams)
(FROM Jeff's previous post):
"To make biscuits: sift together the dry ingredients. Cut in the cold butter either using a stand-up mixer or a pair of hands (you can use your own or somebody else's, as long as they're ok with that kind of thing) until everything resembles coarse crumbles. Leave some pea sized chunks of butter scattered throughout, this will make the biscuits a little more flaky.

Make a well in the center and add the buttermilk or milk all at once. Stir a few times to wet the dough, then let it all sit for about 10 minutes to rest. Turn the very sticky dough out onto a heavily floured surface and fold over on itself five or six times. Use plenty of extra flour if you need it to keep yourself from getting DOUGH-HANDS!! Uhh....disgusting."

While you are working on the dough get the chicken and the potatoes/yams cooking. Once the chicken cooks up a bit put in the chick peas and black beans. Try to mash that mixture up a bit. Kinda shred up the chicken, and mash up the ligumes. Doesn't need to be crazy, but get rid of the big chunks.
Mash the potatoes/yams up, add milk, some butter, some salt, some pepper. Also, chop up some cilantro, tomatoes and some fresh onions.
Roll out the dough on a HIGHLY floured surface. Try to get it as thin as possible without losing the integrity of the dough. The thinner it is, the more times you can roll it, the more times you roll it, the smoooooother the inner parts of the Golden Log will be.
Make a simple cilantro, tomatoes, and onion salsa.

Place the whole log into the oven at ~350F for about 30mins - 1 hour or until the outside is good and crispy. Check the bottom of the log before consuming to be sure that it has cooked all the way through. Cut lengthwise to try to see the roll, and add the salsa to the top. It is a spicy, savory, and very hardy meal that will last days.

April 21, 2009

Fresh Caught Mussels


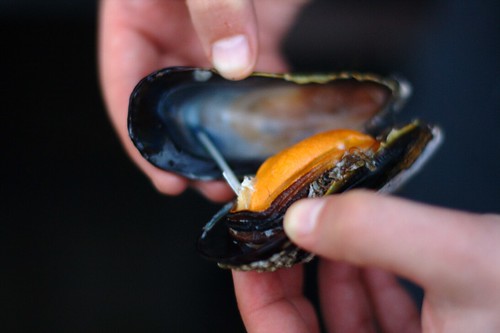
A couple of weeks ago I went on a nice camping trip to some cabins on the ocean. A friend of mine Kate and I like to get mollusks from the sea whenever possible as we are divers. She suggested that we try to snatch some mussels for dinner one night. The tide was low enough on Saturday morning and we were successful at extracting a number of pounds of these delicacies. We actually caught more than we could eat with 20 people (tho many veggies), so it really is easy to get a bunch. The only thing is that you cannot collect mussels between May and Augustish because you can get red tides which makes the filterers toxic to your brain.

To cook:
Scrub clean (doesn't do much good luck)

Pan + Butter + White Wine + Garlic

Let them steam and open up. The ones that don't open are duds. Grab the fiberous material they use to hang on to the rocks and pull it out of its shell. Eat around the fiberous bits and enjoy!

PS
There is really something deeply satifying in hunting/gathering your own food.

April 3, 2009

pineapple spiral

The Spring and Summer seasons of Beijing meet with street intersections laden with vendors selling wares of pottery, services... and fruit.

oh, pineapple quarters: real sweet treat

For the affordable sum of ¥1, the common people pause on a typical afternoon to enjoy a quarter of a pineapple on a stick - a cooling and tangy refreshment to ward off the dryness and heat of Beijing.

The vendors wheel their goods up to the street curb, pull off a tarp that covers a bounty of fresh fruit, and set blade into action...


...With this in mind, it was time to try my hand at this art of carving pineapples and see if I could tame this flowering fruit in my very own kitchen.

April 1, 2009

eggs benedicite

"Making eggs in Beijing can be an exciting deviation from the regular breakfast duty..."

February 28, 2009

Not Your Average Chicken Soup

This soup was recommended for me by my teacher and it's soooooooooooo delicious!

INGREDIENTS

1 whole organic chicken
wild/brown rice
celery
carrot
onion
mushrooms (so far I think shiitake are the best)
parsnip
parsley
bay leaf
3 pieces dang gui tou (angelica sinensis root)
3 pieces bai shao yao (white peony root)
3 pieces bai zhu (white atractylodes root)
salt and pepper to taste

DIRECTIONS

rinse and pat dry the chicken after removing the bag of organs. stuff the cavity of the chicken with the rice (rinsed or presoaked) to weigh it down.


chop the vegetables and add half of them to the pot to contribute to the broth. add all herbs setting aside some parsley for final garnish.


add water until the chicken is totally covered with enough extra that the pot can simmer for 3-4 hours without the chicken being exposed. Bring the pot to a boil then turn the heat way down so that it is only just simmering. You want to slow cook the chicken over 3 hours or so.

around 30-45 minutes before you want to serve the soup, add the remaining vegetables to the pot . after that 30-45 minutes prepare one large bowl and a smaller bowl -CAREFULLY remove the chicken from the pot - it will basically fall apart so be aware and place in the larger of the two bowls. remove all bones and anything else you aren't excited about eating - for me this is any skin and knuckles (even though I have heard these are some of the best parts) - and discard. You can add all the meat back into the soup or you can keep it separate. It's pretty much ready to go at this point! Check the salt and pepper levels and enjoy! garnish with parsley.

I don't have any pics after this point because I get so messy deboning the chicken I can't pick up the camera and then the soup is so good I forget to take any =)

February 26, 2009

Cobler Roll Completed


I took a stab at Jeff's cobler roll this weekend and it turned out great. Took me about two hours from start to mouth to complete. Tasted amazing!

February 15, 2009

Rolled Berry Cobbler

It is Winter, and it's raining...a lot. At least it is today. In this time of overarching wet, cold, and stay-at-homeyness one begins turning to thoughts of warm gooey goodness. Here's something to tide us over.

Fruit Cobbler Rolls


Ingredients:

Berry mix:
2 packages frozen berry mix (or about 4 cups fresh berries, or more, it's up to you)
I used 1 pack of frozen blackberries and 1 back of frozen blue berries this time round.
3/4 cup sugar (or less, or more, to taste)
1 tsp. cinnamon
1/4 tsp. nutmeg
(If cinnamon and nutmeg with berries weirds you out...just skip 'em)
1/2 tsp. salt
2 Tbs. all-purpose flour

Biscuits:
1 1/4 C. unbleached low protein flour (cake flour)
3/4 C. unbleached all-purpose flour
(or just use 2 C. all-purpose flour, the biscuits will be great either way)
3 tsp. baking powder
1 tsp. salt
1/4 C. cold butter, cut into 1/2 inch cubes
3/4 C. milk

Buttermilk Biscuit Variation: Substitute cultured buttermilk for the milk and add 1/4 tsp. to the dry ingredients.

Pre-heat oven to 400 degrees F.

Mix sugar, spices, 2 Tbs. flour, and 1/2 tsp. salt with the berries until the berries are covered and have moistened the flour and sugar. Spread half of this mix into a 2 quart baking dish and pop this in the oven while you make this biscuits.

To make biscuits: sift together the dry ingredients. Cut in the cold butter either using a stand-up mixer or a pair of hands (you can use your own or somebody else's, as long as they're ok with that kind of thing) until everything resembles coarse crumbles. Leave some pea sized chunks of butter scattered throughout, this will make the biscuits a little more flaky.

Make a well in the center and add the buttermilk or milk all at once. Stir a few times to wet the dough, then let it all sit for about 10 minutes to rest. Turn the very sticky dough out onto a heavily floured surface and fold over on itself five or six times. Use plenty of extra flour if you need it to keep yourself from getting DOUGH-HANDS!! Uhh....disgusting.

Roll the dough out to about 3/4 inch thickness and pile on the other half of the berry mix. Roll it all jelly-roll style then pinch the edges so the berries can't escape. Now cut the roll into at least six sections sushi-wise and lay on top of the first half of the berry mix in the now hot baking dish.


Pop everything back into the oven for 15-18 minutes, or until the biscuits firm up and start to brown on the top. Be careful: make sure everything is cooked through. You don't want the bottoms of the biscuits to be all un-cooked and gooey...or do we?


Serve by itself, or with vanilla bean ice cream.


This is Sarah and our cat, Snickers. Both Sarah and I had had a bit of wine at this point and the cat is wondering why I'm in her face with the camera. You can see her thinking it. It's uncanny.

January 26, 2009

Summer Rolls

These summer rolls are a hybrid of the ones Caroline taught me how to make in Houghton and the ones people can buy in Hawaii at Down to Earth ... but better of course!


Ingredients

spring roll wrappers (made of rice or tapioca - banh trang)
bean threads - 2 bundles
tempeh/tofu/whatever protein you prefer
avocado - 2
cucumber - 1
sprouts
carrot (optional) - 1
fresh mint
fresh basil
fresh lime juice

Peanut Sauce - best to make the night before so the flavors can mix well
raw peanut butter
sesame oil
braggs/soy sauce
garlic
lime juice


Directions - This made roughly 6 rolls

The bean threads need to be cooked/softened first - this can be done by boiling them like regular noodles or you can just submerge them in hot water and let them sit until they are chewy all the way through - it's important not to strain them completely because they will dry out.
While the noodles are doing their thing, prepare all the other veggies. I like to seed the cukes and then grate the cucumber (also works to slice, but it gets tricky when it's time to wrap) and carrot (if you're using them), the avocado can be mashed or sliced but I add some salt to it either way.
The tempeh should be cut into strips that are roughly 2.5-3" long, 3/4" wide, and not more than a 1/4" thick if possible. The herbs should be washed and ready to go.
When the noodles are ready, I strain out 3/4 or so of the water and then squish them in my hands to brek them into smaller pieces. I've tried doing this a less 'hands on' way, but the noodles are so slippery and have such a strange texture that cutting htem up with a knife doesn't really work. I suppose you could cut them with scissors, but that kinda takes the wind out of my sails because it's not nearly as fun!


See?!

Once you have all the ingredients ready to go, prepare a frying pan with salty water - the diameter has to accommodate the diameter of the wraps you bought. heat the water until it's hot enough that you can't keep your fingers in the water for more than a few seconds without it being too hot - so just on the borderline of too hot. The wraps are very delicate once they're ready so it's important to be careful if you haven't worked with them before - they rip very easily.
Inspect the wrap for holes before putting it into the hot water. If the holes are on the outer edge of the wrap it's still usable. Start to feel the wrap when the outer edges curl up. You want to gently feel for stiff areas and let thos areas cook longer while not over cooking the rest of the wrap. When the wrap is ready spread it out on a plate - best to let a good amount of the dripping water on the plate.

Building the Roll
1. noodles
2. tempeh/tofu/etc
3. avocado for padding (if using something like tempeh - the side of the wrap can get a hold poked in it)
4. pile the rest on however you want. More mint and basil the better! peanut sauce can be on the inside or outside or both/
5. I roll it up like an eggroll - starting with the bottom (tighten), fold over each short side, then roll it over to finish! (I'm going to try and make a good instructional video of me doing this, but there's one of Angelica at the bottom of this post)


For dessert we enjoyed oranges and merlot sauce! It was cinnamony redwine orange deliciousness!


January 18, 2009

Dad's Kitchen: Merlot Sauce

I'm not exactly sure where my dad got this recipe, but it's pretty delicious!

Ingredients

1 bottle merlot (Dad uses yellow tail - I used fetzer because it was on sale at don quixote for the same price as the yellow tail and I thought it'd be interesting to note any differences)
1 cup sugar (I used the Maui turbinado sugar, but I'd like to try honey or agave)
3-6 cinnamon sticks
orange zest

I quadrupuled this recipe.

Directions

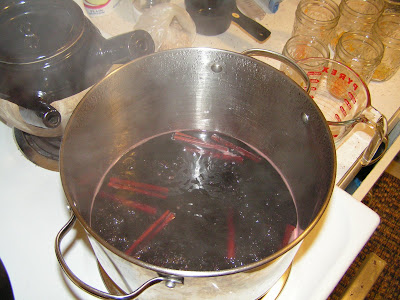
Add wine, sugar, and cinnamon sticks together and bring to a boil stirring to dissolve the sugar. MEASURE the depth of the wine and then boil it down until the volume is reduced by 1/2. I should have timed it, but I think this process took about 2 hours for my 4 bottles.

When the wine is close to finishing it's reduction, zest the oranges and put ~1tsp. in each of the containers you're going to store it in. In my case they are 8oz. mason jelly jars - perfect! You may want to increase the amount of zest if you're using a large container.


Fill the jars (or whatever glass container you're using) and seal them. The mason jars were nice because they self sealed because the wine sauce was so hot when I put the lids on, so I didn't have to worry that they'd leak all over the place when I biked them to work!

The original recipe calls for the sauce to be poured over cut up orange sections. This is delicious! After trying the sauce with the oranges I think it's easier to imagine other foods to combine the sauce with.

Thanks Dad!